How to draw wireframes in 5 simple steps

Whether you are designing apps or webpages, wireframing is likely going to be a big part of your day-to-day workflow. Despite the recent rise of user-friendly, online wireframing tools such as Uizard, one wireframing method that remains a favorite of designers the world over is good old-fashioned, hand drawn wireframing.
Although hand drawing wireframes might seem straightforward with its extremely low barrier to entry, there’s quite a bit more to it than first meets the eye. A good hand sketched wireframe isn't quite as simple as a few boxes and CTAs jotted down on the back of a scrap of paper.
If you want your drawn wireframes to be a success, you really need to think about what the purpose of your wireframe drawing is and how it's going to benefit the design process in long run. Here is the Uizard guide to drawing an app or website wireframe...
Skip to section:
Why should you hand draw your wireframes?
How to sketch wireframes in 5 easy steps
From hand drawn wireframe to mockup with Uizard Wireframe
Can wireframes be hand drawn?
Yes, wireframes can definitely be hand drawn. In fact, many designers start the wireframing process with pencil and paper. It's a quick and easy way to sketch out ideas and plan the basic structure of a webpage or app before moving on to high-fidelity prototyping.
Hand-drawn wireframes are typically low-fidelity, meaning they are basic and don't include a lot of detail. They are used to map out the general layout and functionality of design at relatively low effort and cost. After creating hand-drawn wireframes, designers often move on to wireframing tools for higher-fidelity versions that can include more detail, be easily edited, and be shared digitally with team members and stakeholders for feedback and iteration.
Why should you hand draw your wireframes?
The beauty of sketching wireframes by hand is fairly obvious, it’s accessible to almost everyone. Regardless of where you are when an idea comes to you, if you have a pen or pencil on you, you can kick off the wireframing process in a matter of seconds.
Hand-drawn wireframing is extremely low effort, and uses little resource, meaning that it is a cost-efficient way to visualize ideas and share rough concepts with your team. Most importantly, hand drawing wireframes is extremely cost effective. If you are in the very early stages of development, you can ideate and iterate hand drawn wireframes for free with minimal cost and effort.
How to sketch wireframes in 5 easy steps
Looking to start hand-drawing your wireframes? Here are five easy steps to make drawing wireframes a breeze. Our wireframing steps will guide you to create designs that match your project goals whilst also following key UI design best practices:
- Decide what device you are designing for
- Draw your design navigation first
- Center your design around your product or USP
- Add image blocks, text blocks, and other large elements
- Add in CTAs (calls to action) and other navigational elements
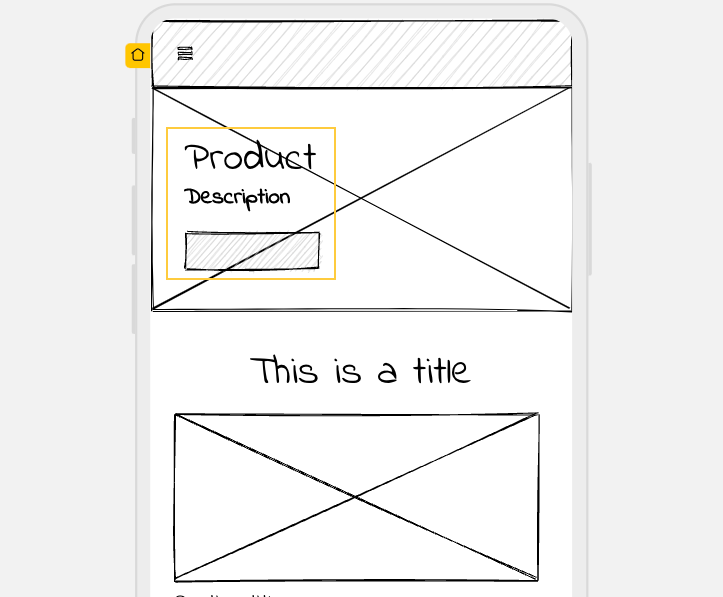
Step 1: Decide what device you are designing for
It sounds simple, but deciding what device you’re designing for is crucially important, not just for the design process itself, but also when it comes to the UI and UX ramifications of the design. If you are working on a mobile app design, you will want the right aspect ratio and the right assets and elements called out throughout the design to support the wider aims of your project.
Similarly, if you are working on a web page design, you will need to think about how user interaction with keyboard and mouse might affect your potential users in practice. Here are the standard resolutions you will need to be thinking about, depending on what type of product you are designing:
- Desktop: 16:9 aspect ratio (typically 1920x1080 pixels)
- Mobile: 16:9 landscape aspect ratio (typically 720x1280 pixels – although this can vary greatly based on the type of device)
Step 2: Draw your design navigation first
From a site architecture point of view, and a UI point of view, the navigation of your web or app design really is one of the most important parts of your design. Although most elements will vary from page to page (or from screen to screen) the main navigation will be the mainstay across all pages, allowing for easy linking to the core pages of your design regardless of where a potential user may find themselves.

The type of navigation you will want to include will, again, depend on the device you are designing for. As a rule, desktop designs should have a horizontal main navigation at the top of the screen, and tablet apps or web app designs will have a vertical side navigation.
For mobile sites or apps, navigations tend to be hidden behind the classic hamburger button which, when clicked, will expand to show the user the full navigation. To draw your navigation for mobile designs, we would recommend drawing a specific screen demonstrating your expanded nav, with all other screens in the design simply showing where the nav button will sit.
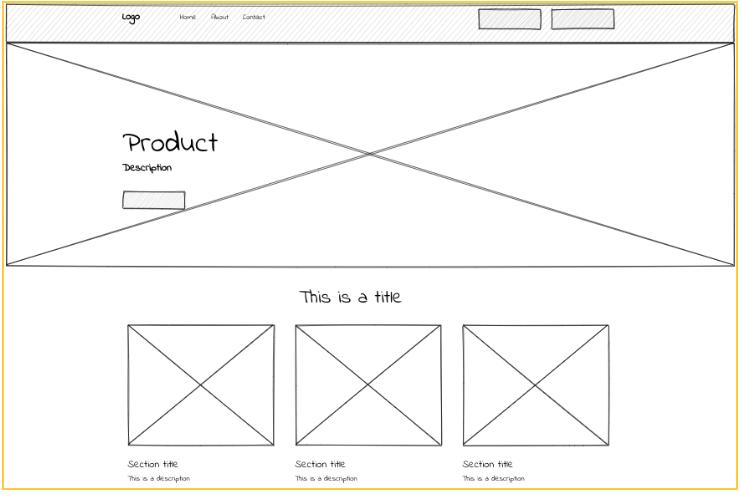
Step 3: Center your design around your product or USP
This should go without saying but, if you are creating a design for a product or service, ensure that you position that product centrally across your core landing pages. If the aim of your design is to promote a product, this should always be the focal point of your design. Sure, you may have informational pages that don't directly link to your product, but these should be secondary to your main USP pages.
As an example, in the image above, the product is featured in the hero banner of the main landing page. Positioning your product or service centrally in your design makes it clear what the purpose of your design is, which will almost certainly improve user understanding and outcomes once the user has your app in their hand.
Step 4: Add image blocks, text blocks, and other large elements
You've drawn a screen, navigation, and positioned your MVP, product or service, now it's time to embellish your design with secondary visual elements that will be used to brand your design and lend it some aesthetic style when you move on to the mockup or prototype stage.
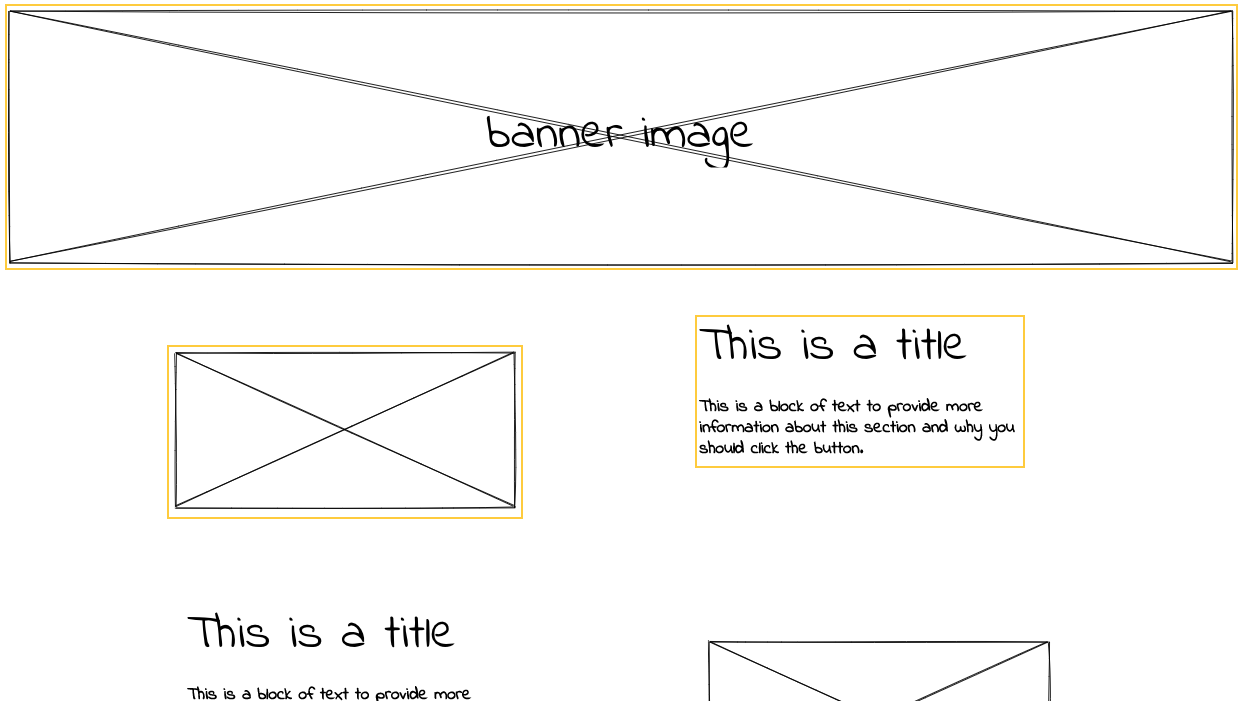
As in the above image, adding space for text and image enrichments adds a little meat to the bones of your hand drawn wireframe. Sure, these will probably get moved around at later stages in the design process but, for now, it helps to give you an idea of the overall feel of your project.
Step 5: Add in CTAs (calls to action) and other navigational elements
Finally, you want to think about on-page CTAs. These are a great way to demonstrate how a user navigating a specific page can be directed to another page. For example, you may want to place a 'shop now' CTA on your homepage so users can directly navigate to your PDP (product display page).
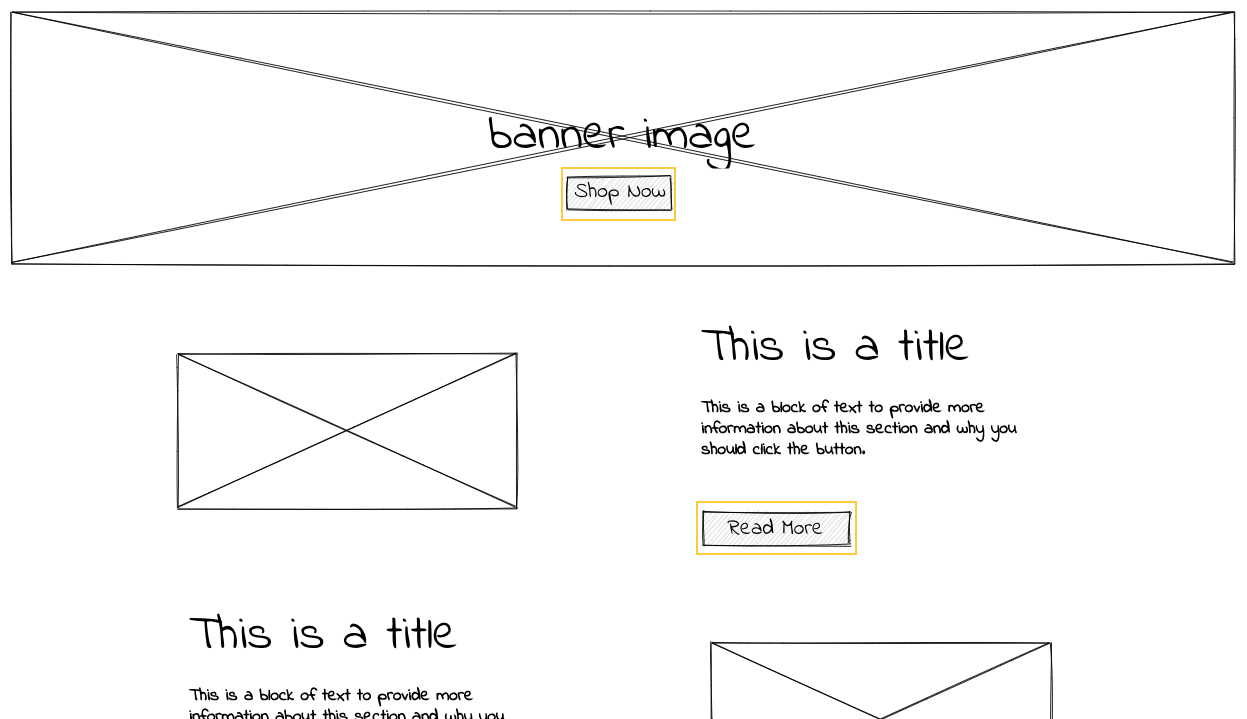
Classic examples of CTAs include 'read more', 'shop now', or 'sign up'. These are clear and simple and accurately convey the purpose of the CTA to your prospective users.
From hand drawn wireframe to mockup with Uizard Wireframe
So, you’ve drawn your wireframes by hand and you may have even shared your project with colleagues, teammates, or friends, but what comes next?
Once you have your wireframe drawn out in pen or pencil, the next step is digitizing these drawings so you can advance your project... this is where AI comes in.
Digitizing your hand-drawn wireframe has never been easier with Uizard’s AI-powered Uizard Wireframe! Simply take a snap of your design or upload an image to the Uizard interface and let us do the rest.
As demonstrated in the video above, once your wireframe has been digitized, you can even transform your wireframe into a medium fidelity mockup, meaning you can go from hand drawn wireframe to functional prototype with a few clicks of a button. Need more advice for moving on to the prototyping stage of your design journey? Check out our guide on how to go from wireframe to prototype with Uizard.
Ready to give Uizard a go? Sign up for free and try out Wireframe Scanner as well as a host of other incredible features. Got more questions when it comes to the world of wireframes? Head over to the Uizard Blog to find out more.