A beginner's guide to Uizard
Welcome to the magical world of Uizard! If you're new to the design game, or simply looking for an easy-to-use tool to design stunning user interfaces for apps and websites, then you've come to the right place. With the power of AI, Uizard is changing the design game for good, and there's never been a better time to hop on your broomstick and join the magical movement.
Whether you're a UI design pro or just starting out, Uizard is here to transform your workflow with rapid, collaborative, easy-to-use design. With Uizard's intuitive interface, you can bring your vision to life in a matter of minutes, not hours, regardless of your level of design experience or expertise. Uizard will even help you save precious time and resource, allowing you to focus on the things that really matter.
Don't know where to get started? In this beginner's guide to Uizard, we'll show you how to make the most of the world's easiest-to-use AI design tool to really transform the way you and your team ideate, design, and iterate. Whether you want to know how to kick off a project with some AI design magic, or how to collaborate in real-time, we've got you covered. In this article you'll learn:
- How to kick off a project
- How to edit in Uizard
- How to collaborate in Uizard
- A little about Uizard templates
- And an overview of Uizard’s magical AI features
Ready to learn a little magic? Then let's get started. Here is your beginner's guide to using Uizard to streamline your workflow like never before.
Skip to section:
Starting a project from scratch
How Uizard's AI features can transform your workflow
Adding user journeys to your Uizard mockups
How to get started
You've signed up to Uizard, you've got an army of great UI design ideas waiting in the rafters, but what comes next? Once you've signed into Uizard for the first time and completed your onboarding tasks, you are ready to get started with your first project. In the interface, simply click 'Create new project' to advance through to the 'create' screen.
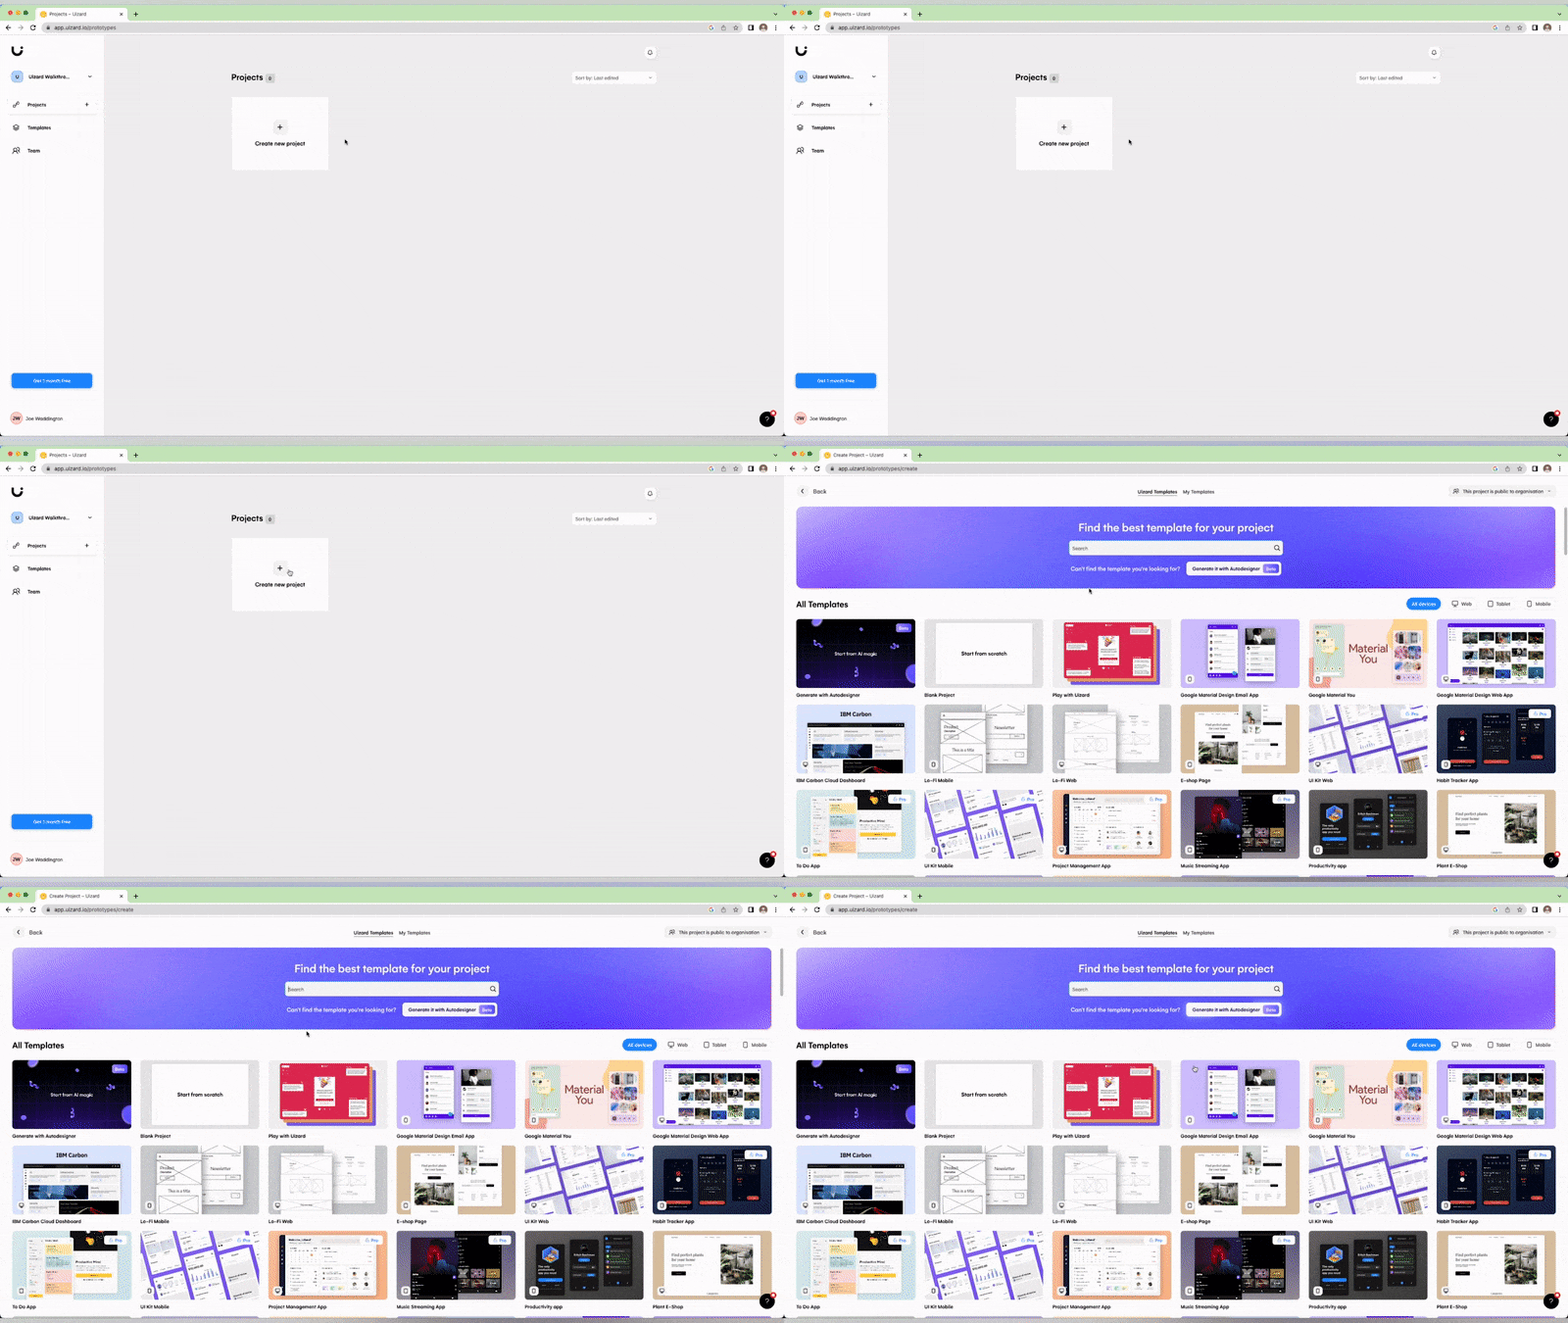
Here you have a few options. You can click 'Start with AI magic', 'Start from scratch', or, if you know exactly what you want to design or you at least know what niche you are designing for, you can select one of Uizard's pre-made UI design templates.
Templates are a great way to save time and get inspiration and Uizard offers multi-screen templates for both app and website design. Each template comes with all the must-have screens and UI design components baked in (including the core user click journeys to really help you demonstrate how your prospective users would navigate through your design).
Have a browse through the embedded Uizard template prototype below to get a feel of what to expect when you use one (clickable links flash in blue). It's also worth remembering that Uizard templates are 100% customizable, meaning you can easily put your own spin on things with branding, UI themes, or additional screens.
Starting a project from scratch
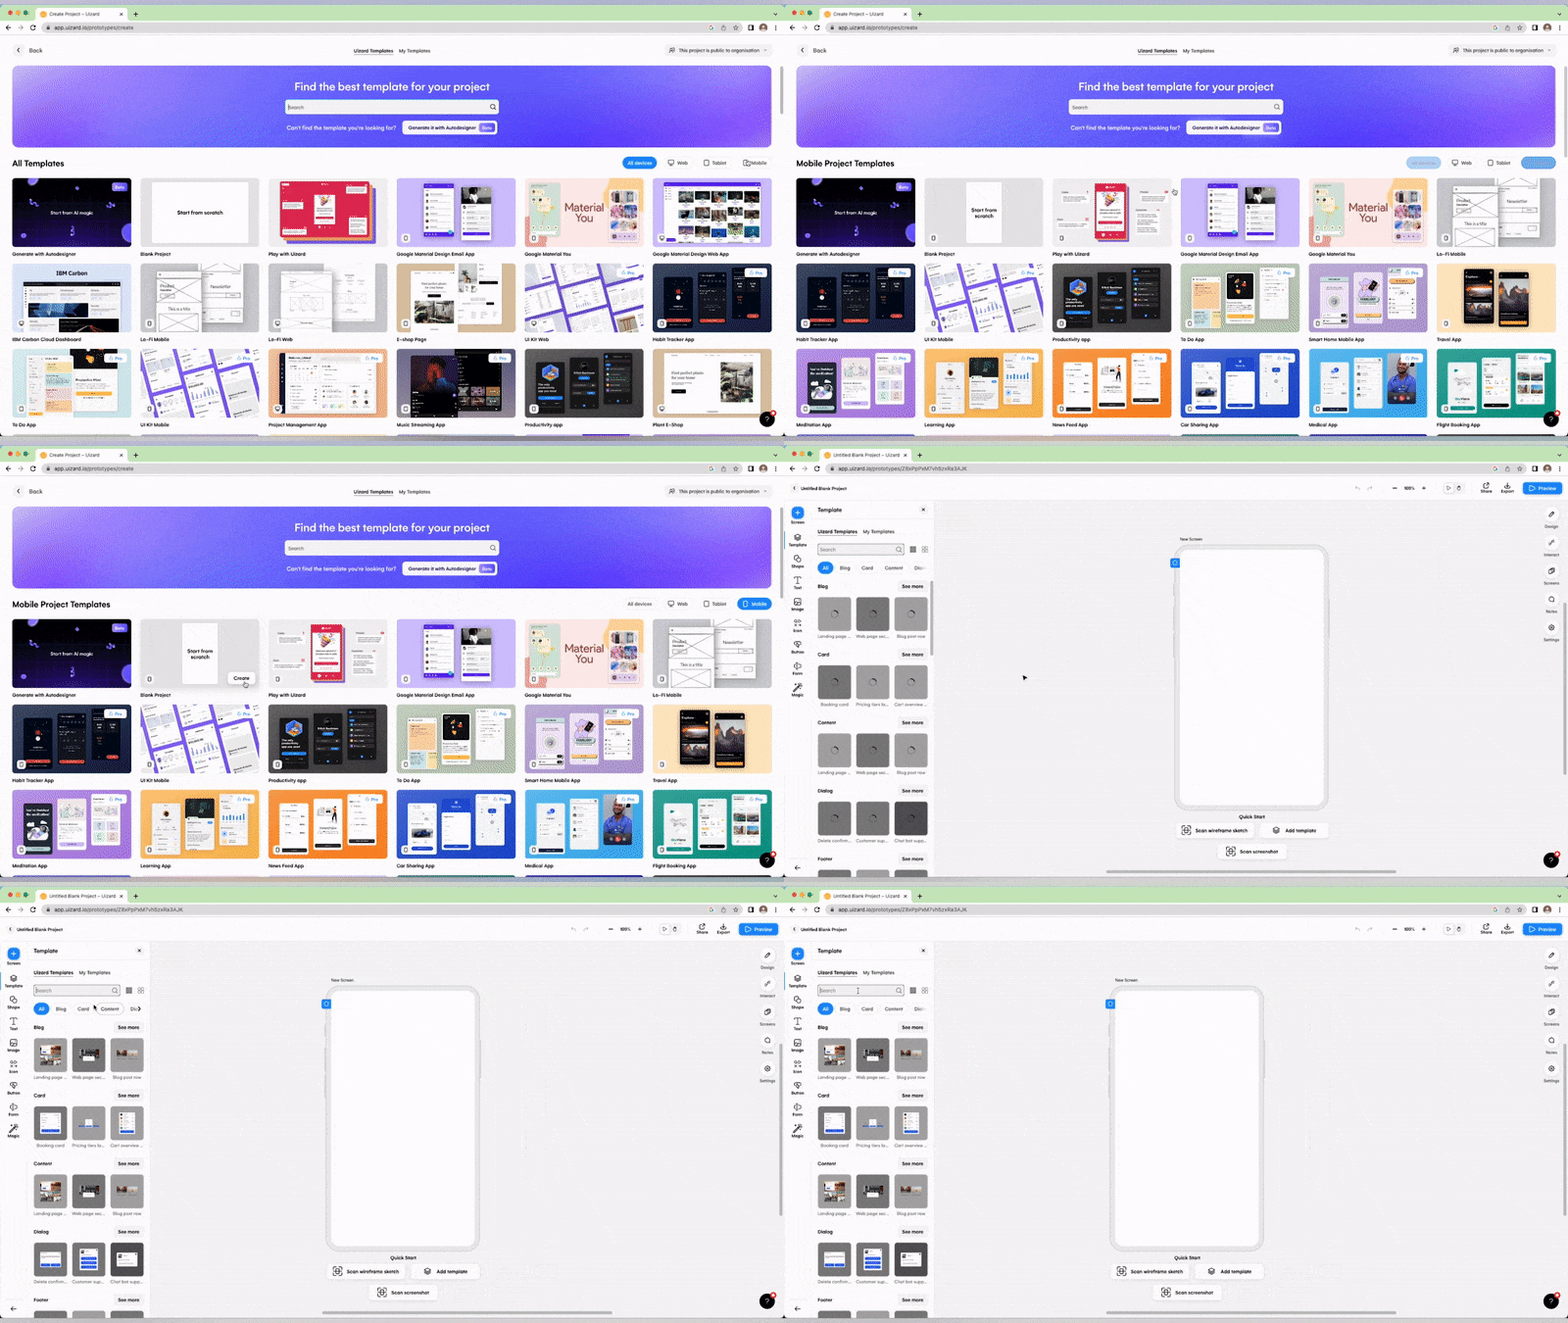
Don't see what you need in the template library? Maybe you want to create something from the ground up? Starting a project from scratch gives you a completely blank canvas to bring your vision to life. To start a project from scratch, simply navigate to the 'create' screen, select your device of choice (either web, mobile, or tablet) and click start from scratch.
Understanding the Uizard layout
Ok, so you've opened a template or opened a blank project, now it's time for the fun to begin. Before we dive into the detail though, it's important to get a bit of an understanding of how the Uizard interface works (spoiler: it's really simple and easy).
At its heart, Uizard is an easy-to-use, drag-and-drop editor and has been tailor-made for rapid and collaborative workflows. On the left, you can find Uizard's pre-made components library, as well as individual UI elements such as text blocks, image blocks, buttons, and icons.
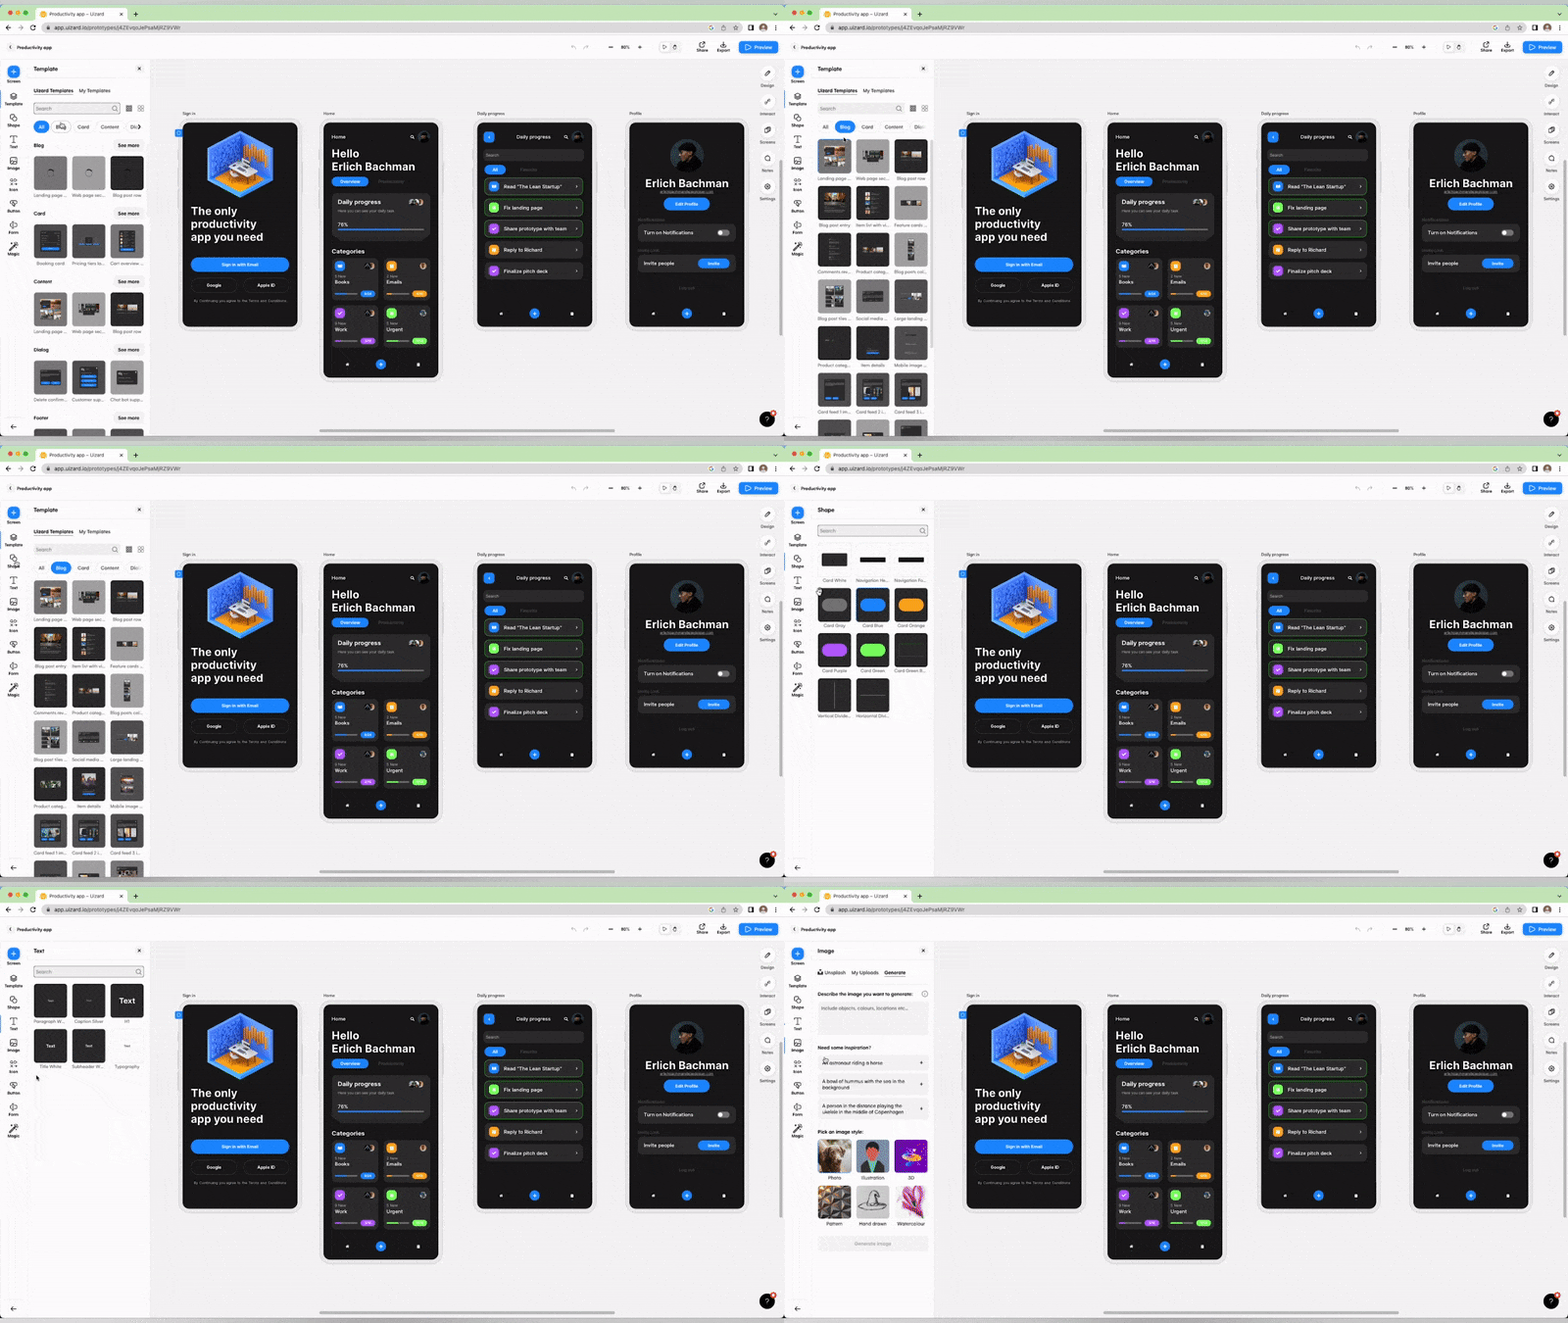
On the right, you can find Uizard's screen management, notes, and settings. To edit specific elements in your project, you can simply click on them to bring up Uizard's intuitive design menu. Here, you can edit the size, shape, style, and layout of any component or block.
Using Uizard really is that easy... components on the left, editing and settings on the right.
How to collaborate in Uizard
Before you dive in, it might be a good idea to invite your team for some real-time collaboration. To invite your teammates, simply click on the sharing button found in the top right-hand corner of the Uizard app.
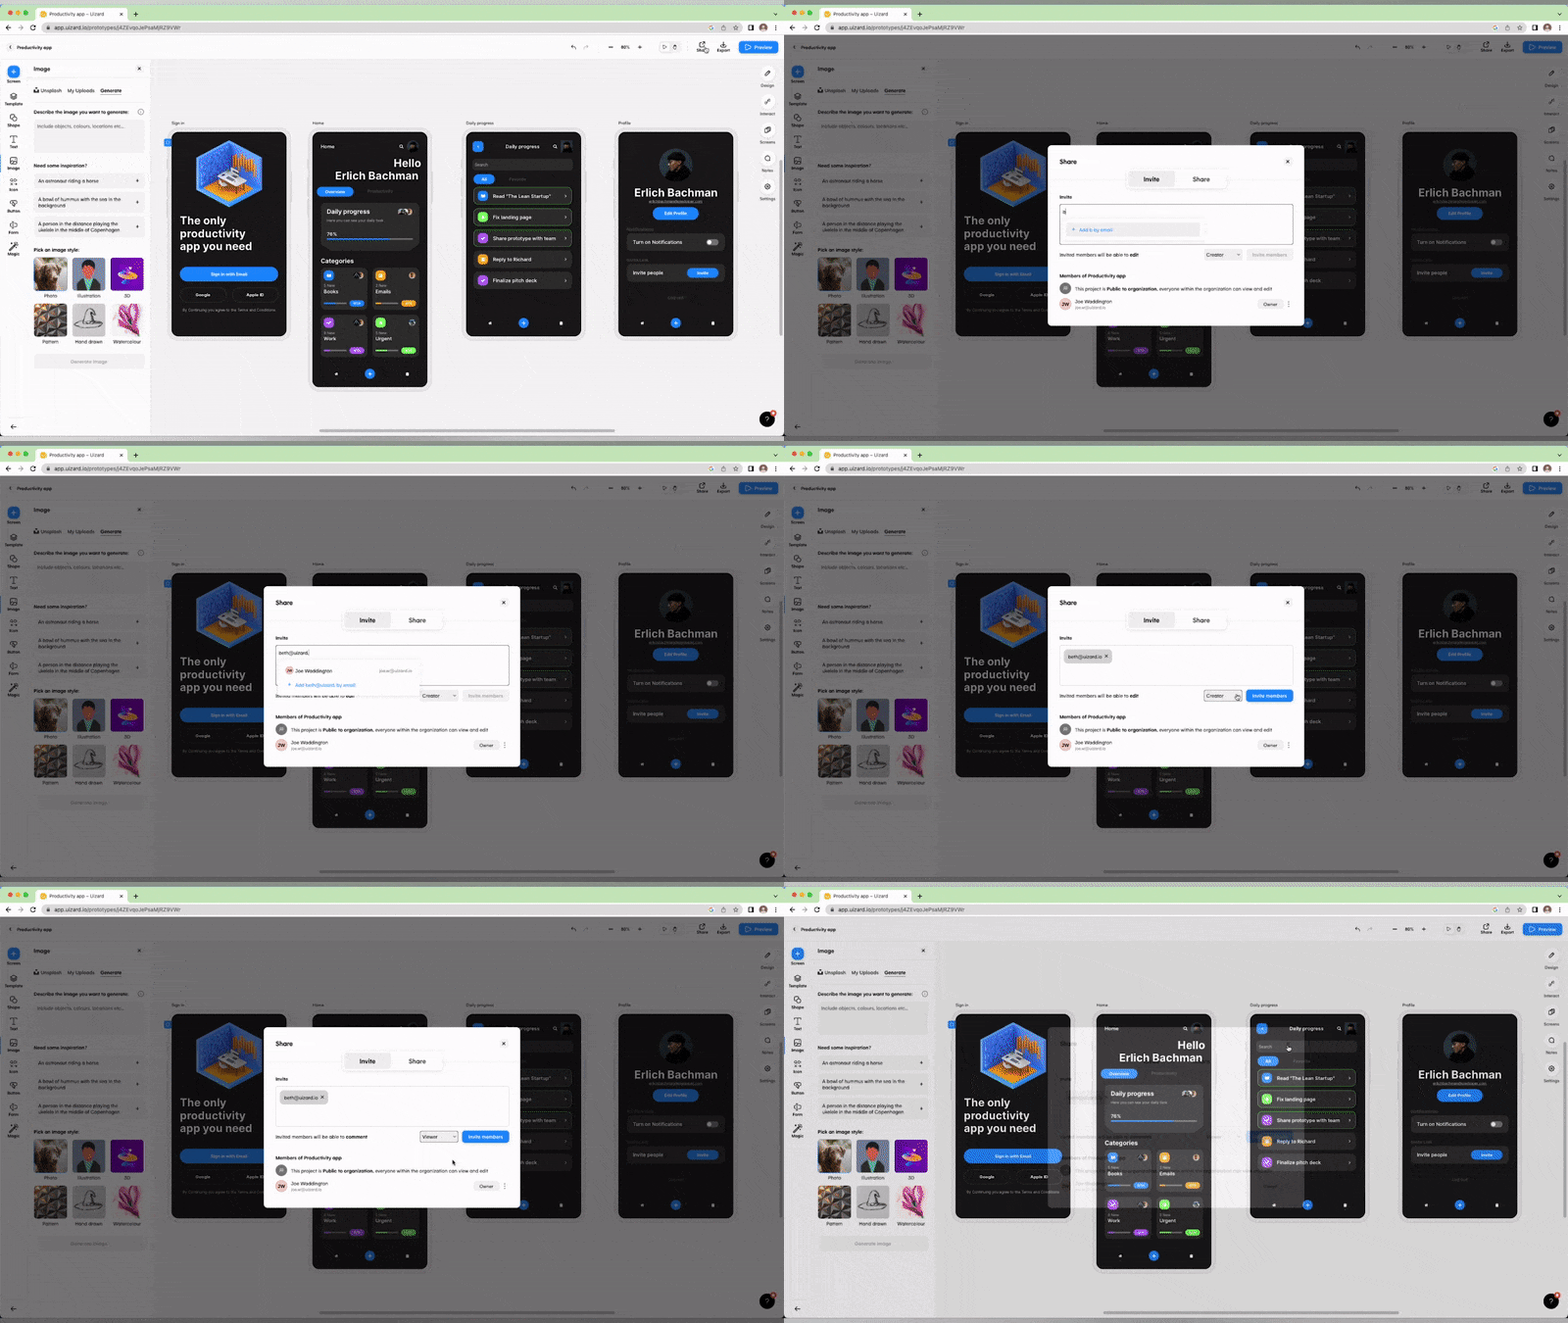
Once here, the sharing menu will pop up, and all you need to do is type in the email address of the person you want to share your project with and click send. They will then be invited to log in and join your project or sign up to Uizard for free if they've not already done so. You can even choose whether you want to give them edit access or simply allow them to view your project and leave comments.
Speaking of comments, leaving feedback on your design or opening conversations to your team is super easy with Uizard's notes system. Click the notes button found in the right-hand nav of the interface to activate feedback mode. Once activated, you can click anywhere on the canvas in front of you to leave a note for your team.
Editing your Uizard designs
Ok, so you’ve opened a template or created a blank project and invited your team, now it's time to edit your project to make it your own. Uizard has everything you need to create, edit, and iterate your design, as well as work across varying levels of fidelity.
Adding Uizard components
Adding components to Uizard is quick and easy. Simply visit the menu on the left-hand side of the interface. You can use Uizard's category menu to find what you are looking for, type what you need in the search bar, or simply scroll through the library until inspiration strikes.
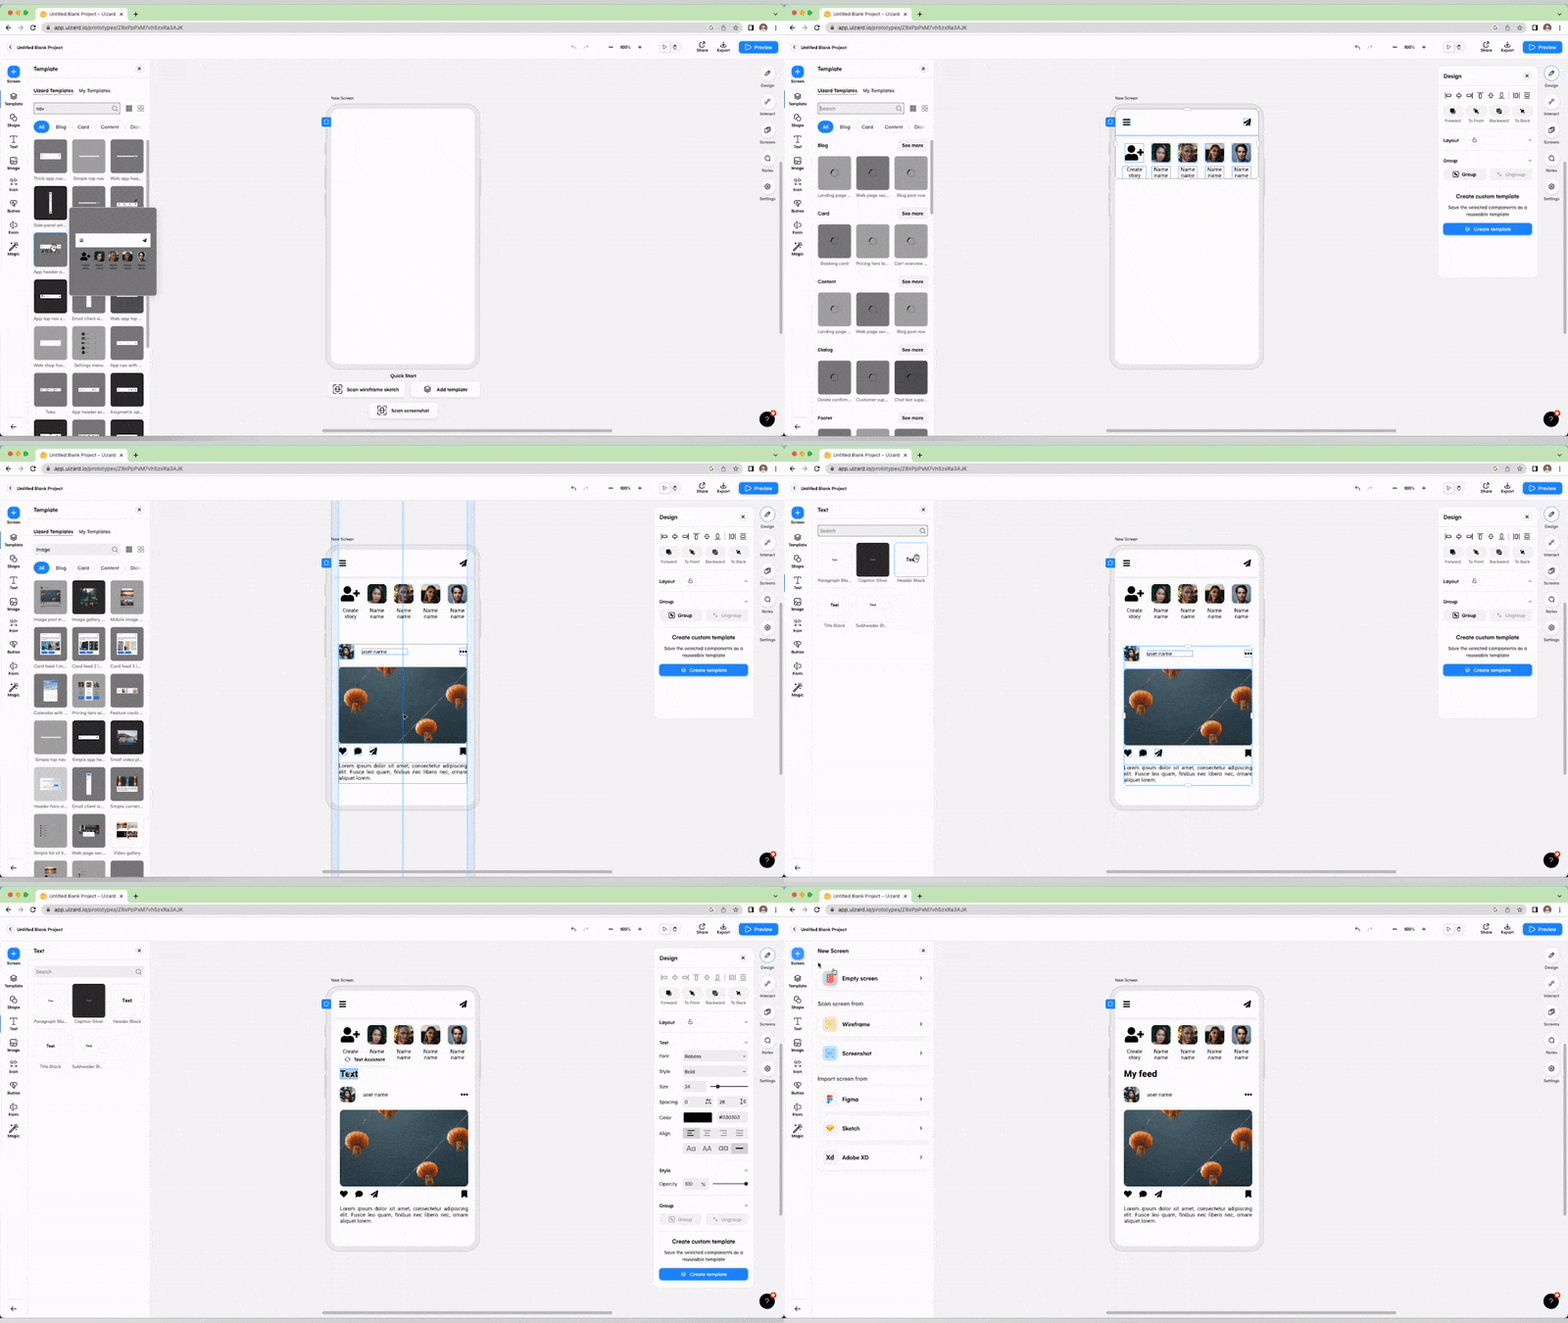
Adding individual elements
As well as composite components, Uizard also empowers you to drag and drop individual elements such as buttons, icons, images, and text boxes.
A word on blank screen syndrome
Let’s rewind a bit... as we all know, blank page syndrome can be a huge blocker to your productivity and project outcomes; that's where AI comes in.
How Uizard's AI features can transform your workflow
With Uizard's core AI design features, you can kickstart a design project faster than ever before...
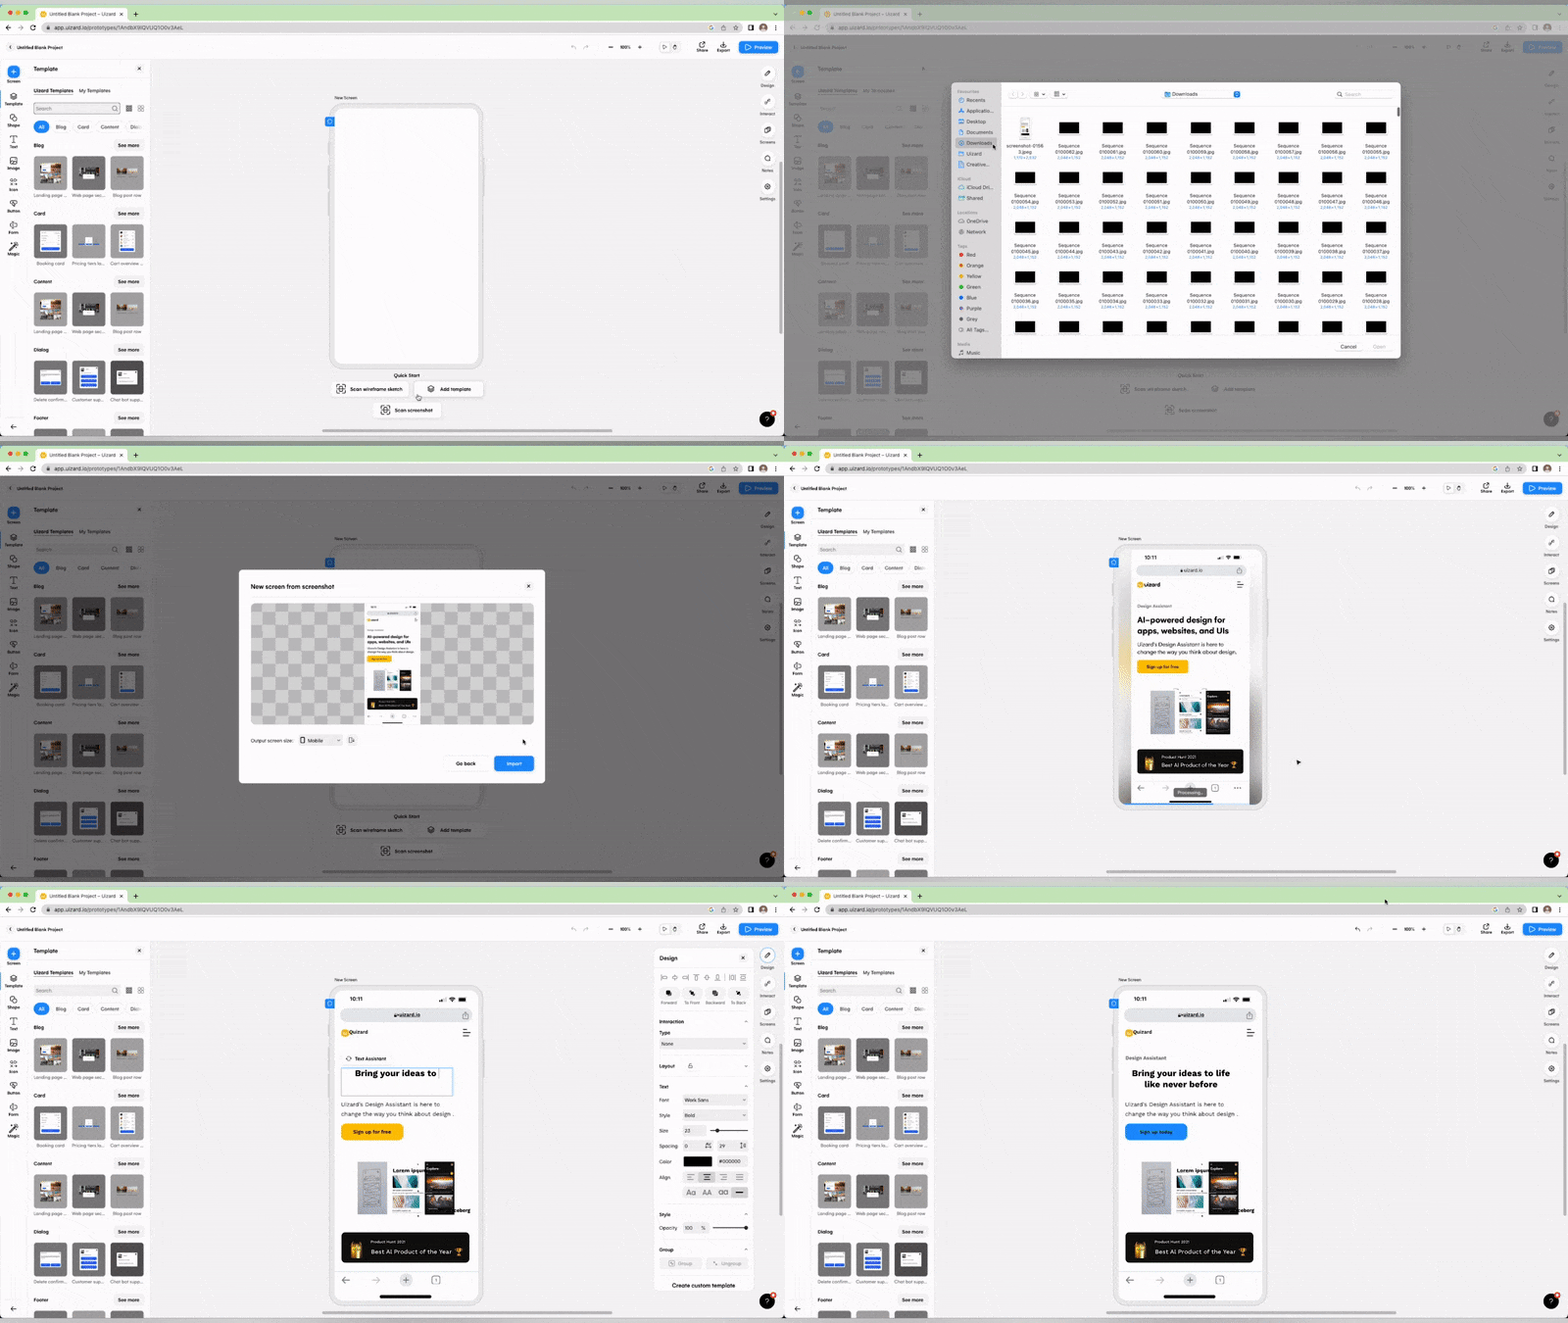
Screenshot Scanner: Scan a screen grab and turn it into an editable mockup in seconds with Screenshot Scanner. The possibilities are endless here. You can upload screenshots of your favorite apps and websites and use them as a kickoff point for your projects, or you can import screenshots of your own screens or web pages to supercharge how you optimize and iterate.
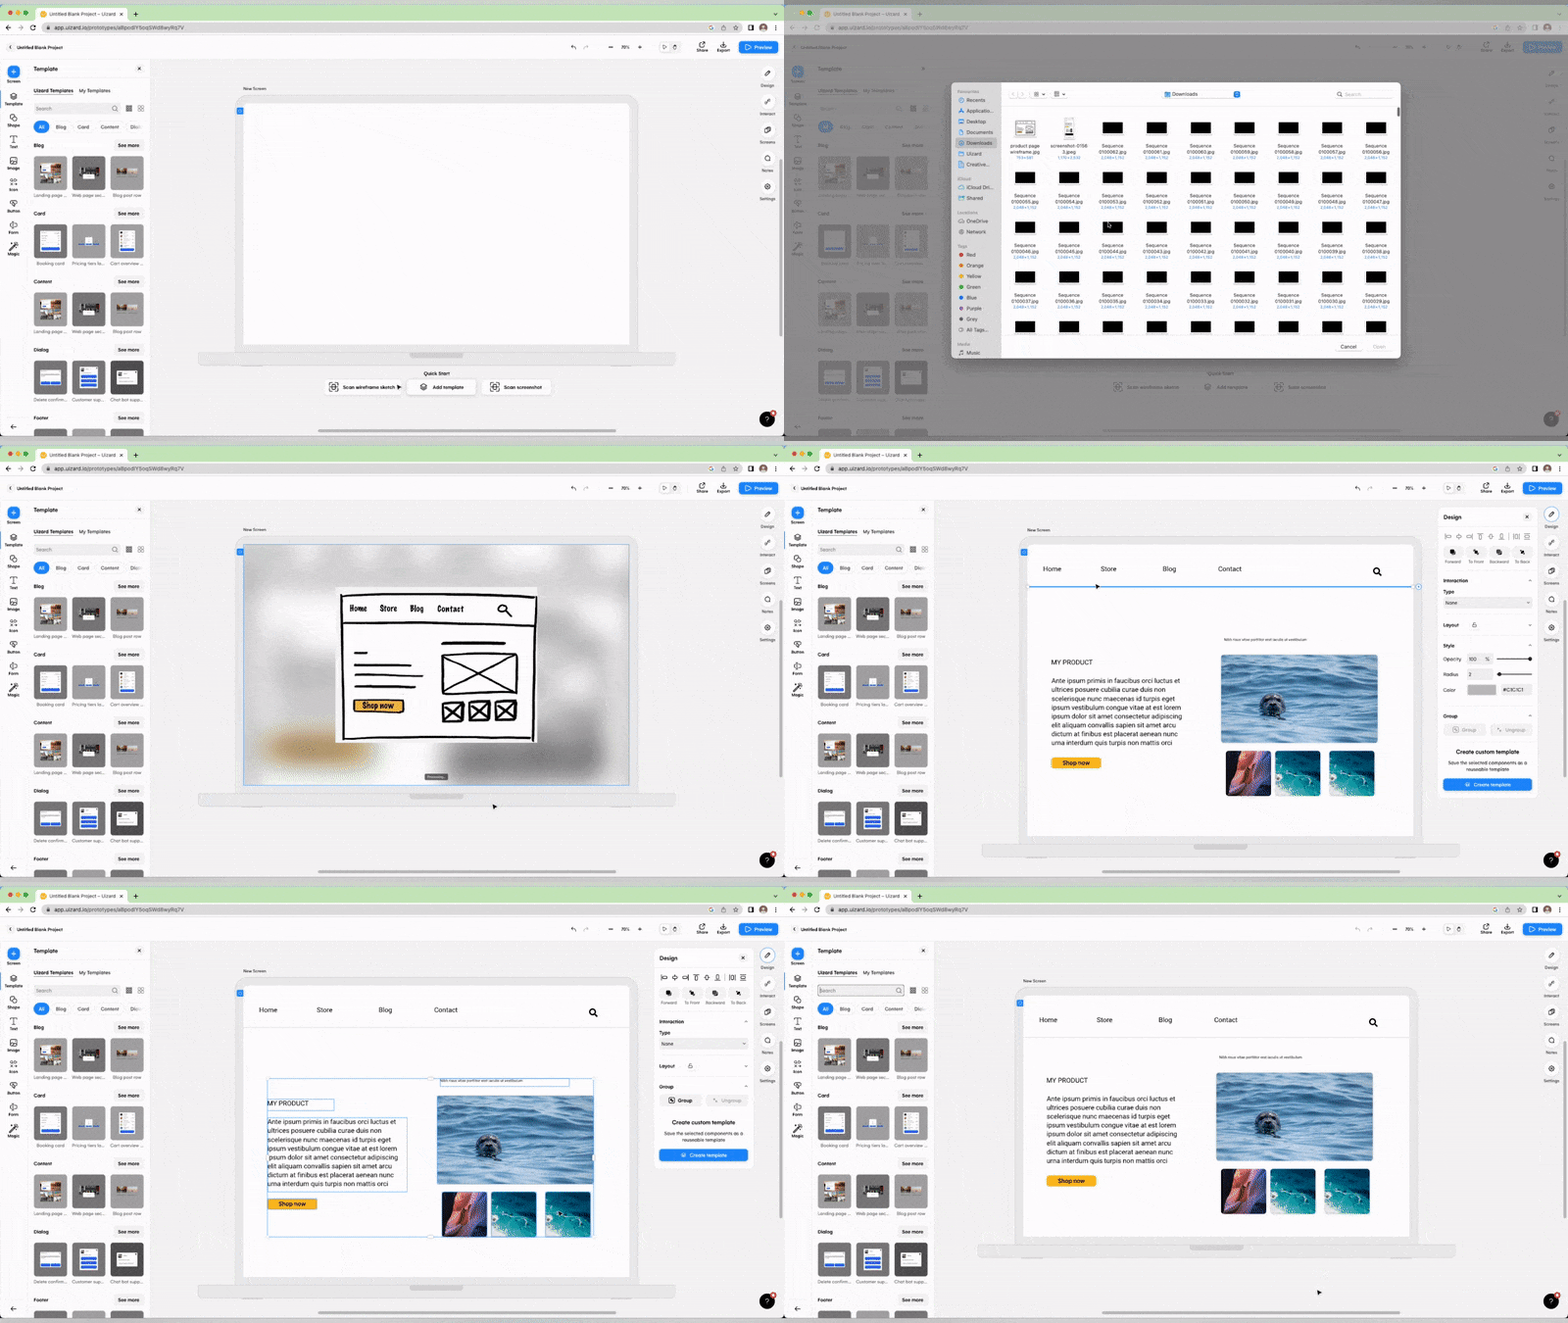
Wireframe Scanner: Upload your hand-drawn wireframes and digitize them in seconds with Wireframe Scanner. Perfect if you prefer ideating with pen and paper.
Uizard Autodesigner: Generate a design with a simple text prompt… Simply type in an idea in plain English, specify a theme, and let the power of AI generate an editable multi-screen mockup (this feature is currently in Beta and will be available for Uizard Pro users only, so sign up to the waitlist to get access soon).
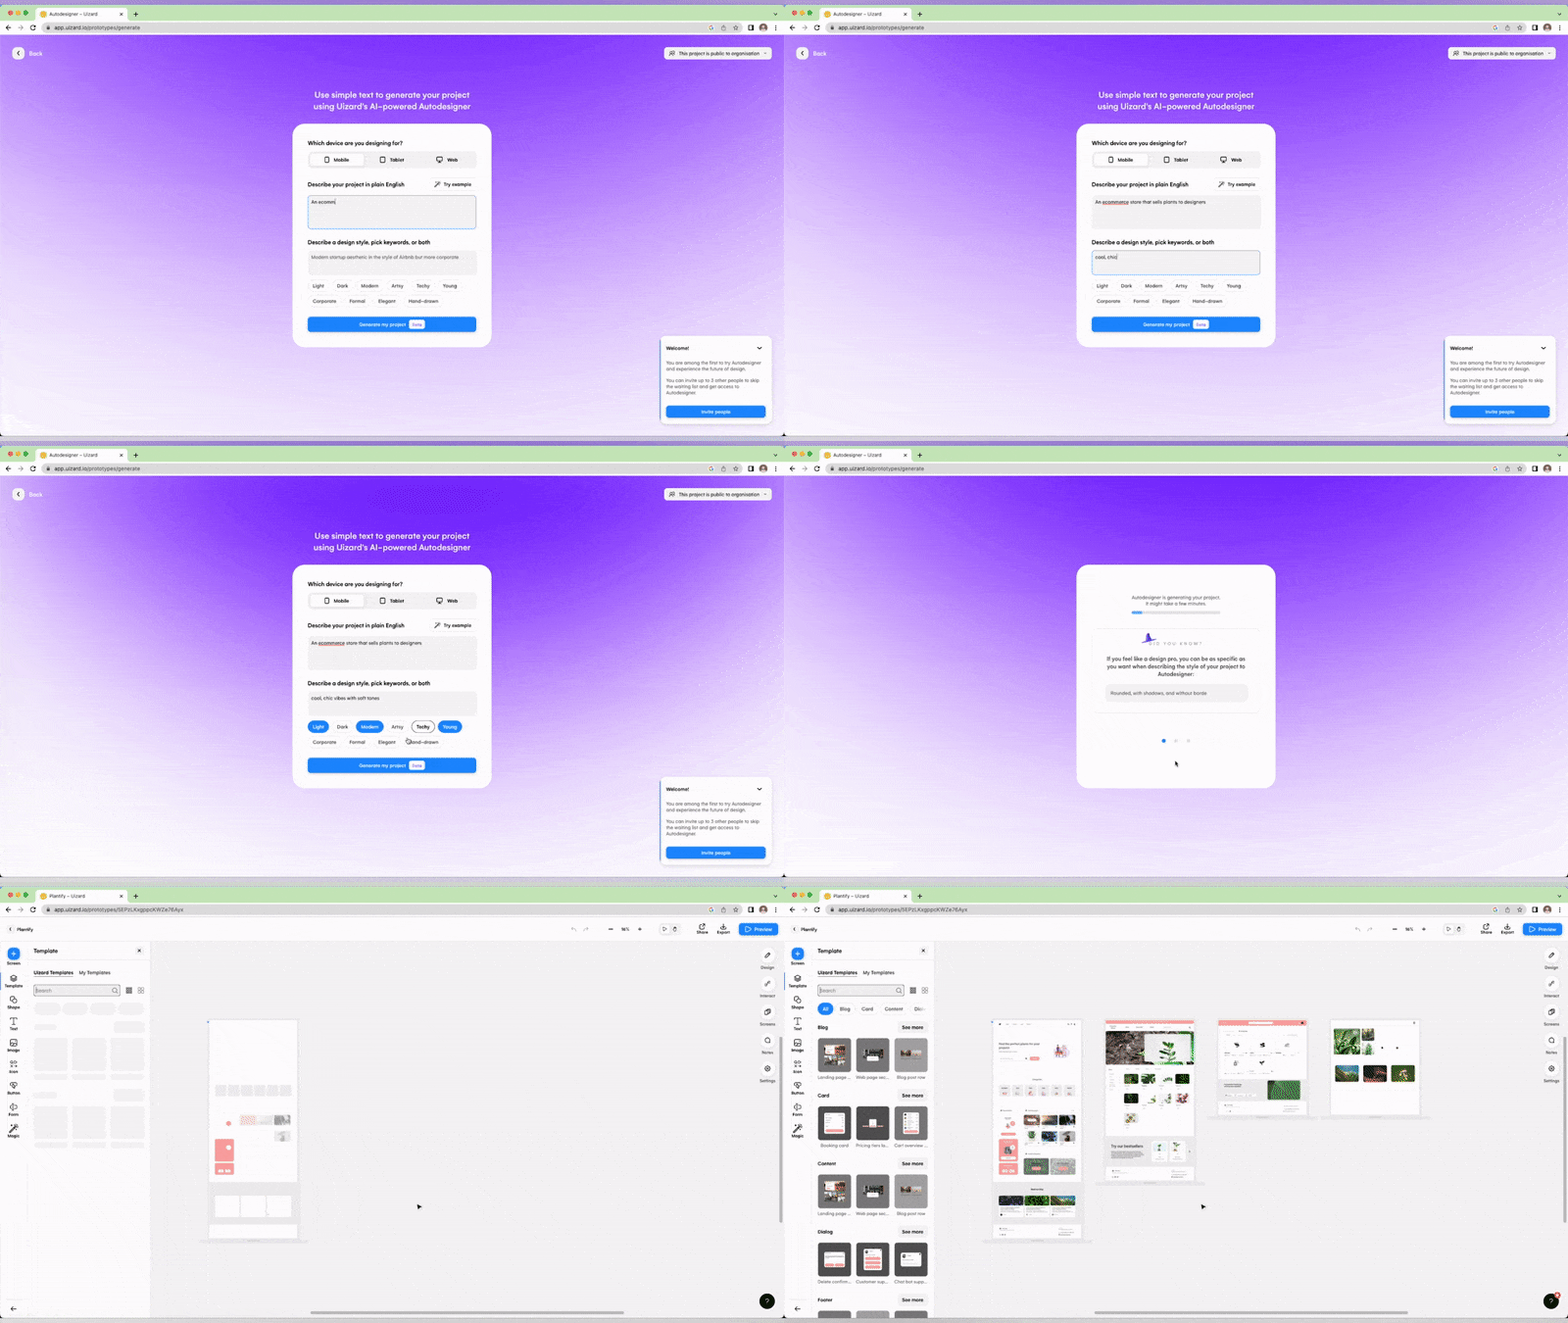
Alongside Uizard's three cornerstone features, you can also find a library of supplementary tools to support your workflow. For example, you can update the entire theme of your project using Theme Generator. Manually select your color palette, upload a screenshot, or paste in a URL to generate a theme.
Uizard also has Wireframe Mode which allows you to switch between low and medium fidelity with the click of a button, making stakeholder management easier than ever before.
Or use Image Generator to create images from text prompts. Simply type what you want the image to contain, specify an art style and watch as your concepts materialize on the screen - there's never been a better way to create unique images to enrich your UI designs.
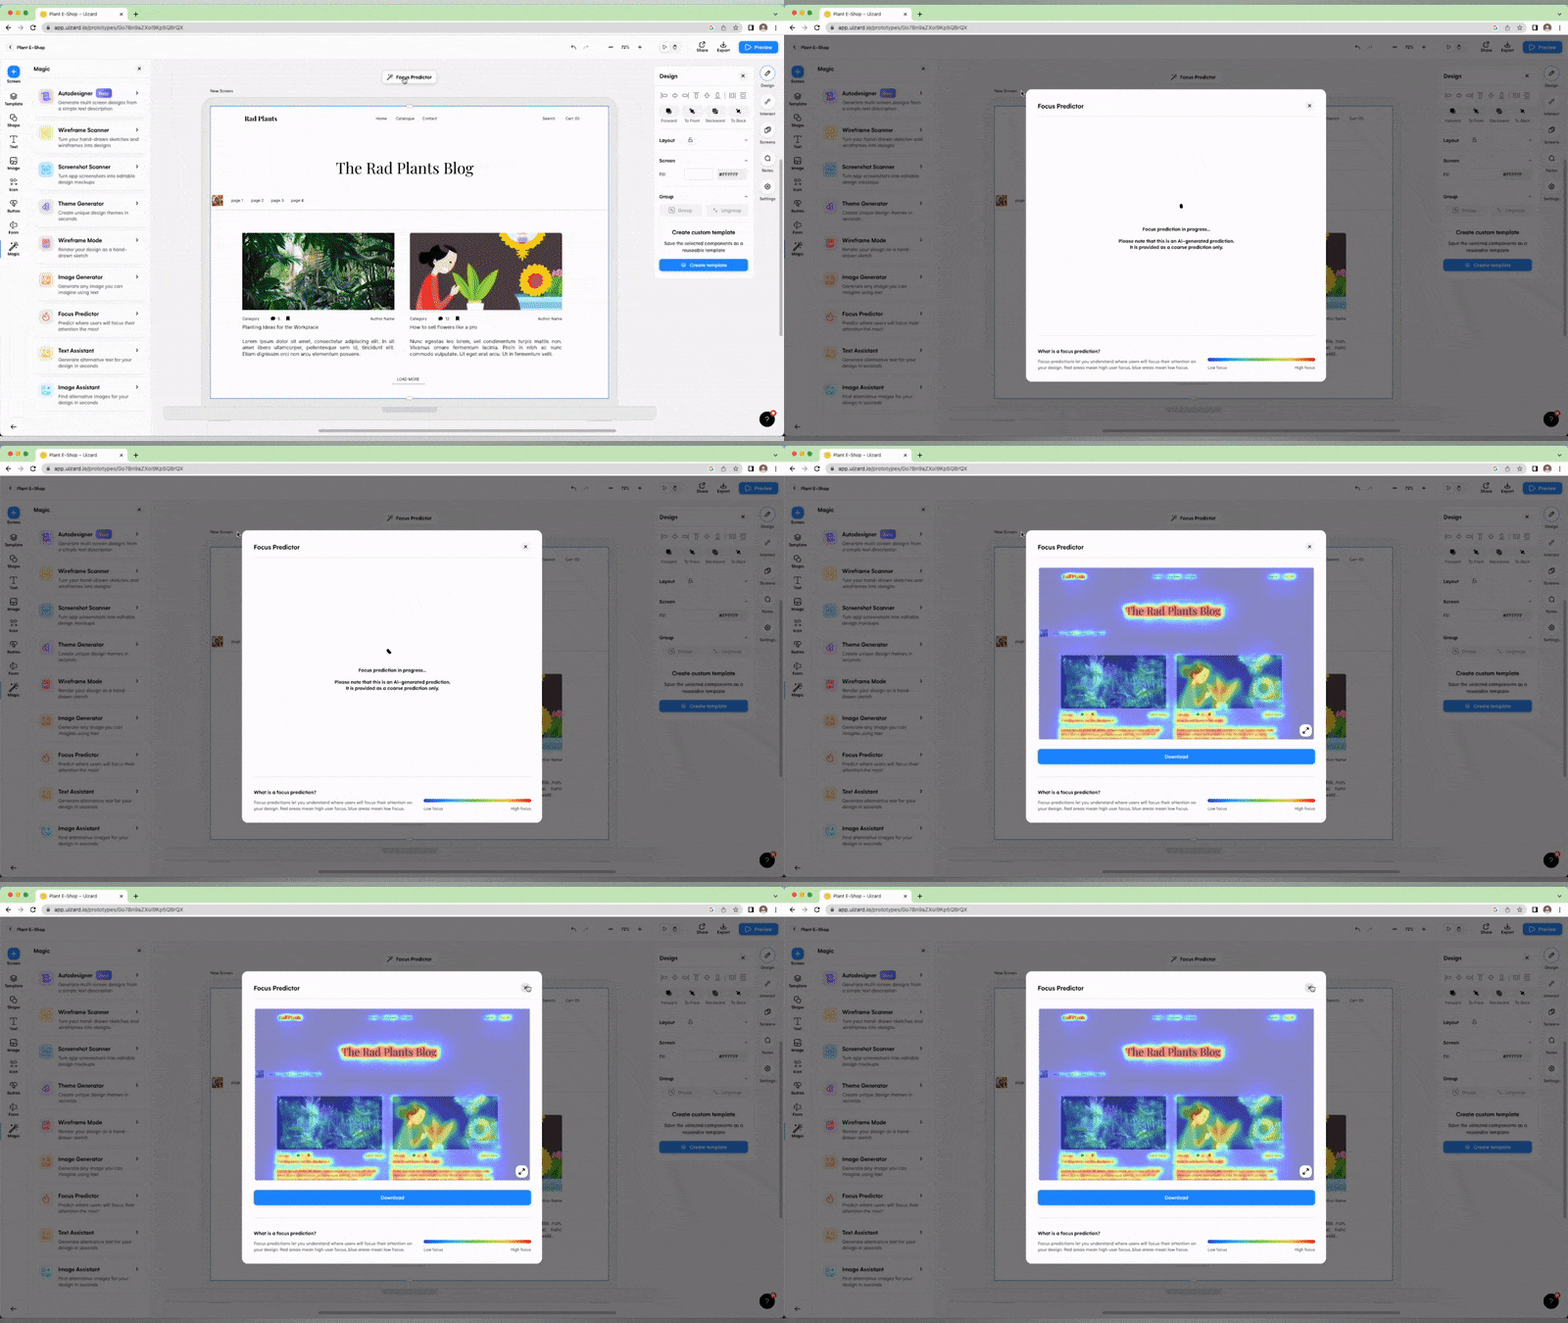
With Uizard, you can even take a sneak peek at where your prospective user's attention will be drawn when navigating your design, simply select your screen and click the Focus Predictor button to get an instant analysis of your project.
Adding user journeys to your Uizard mockups
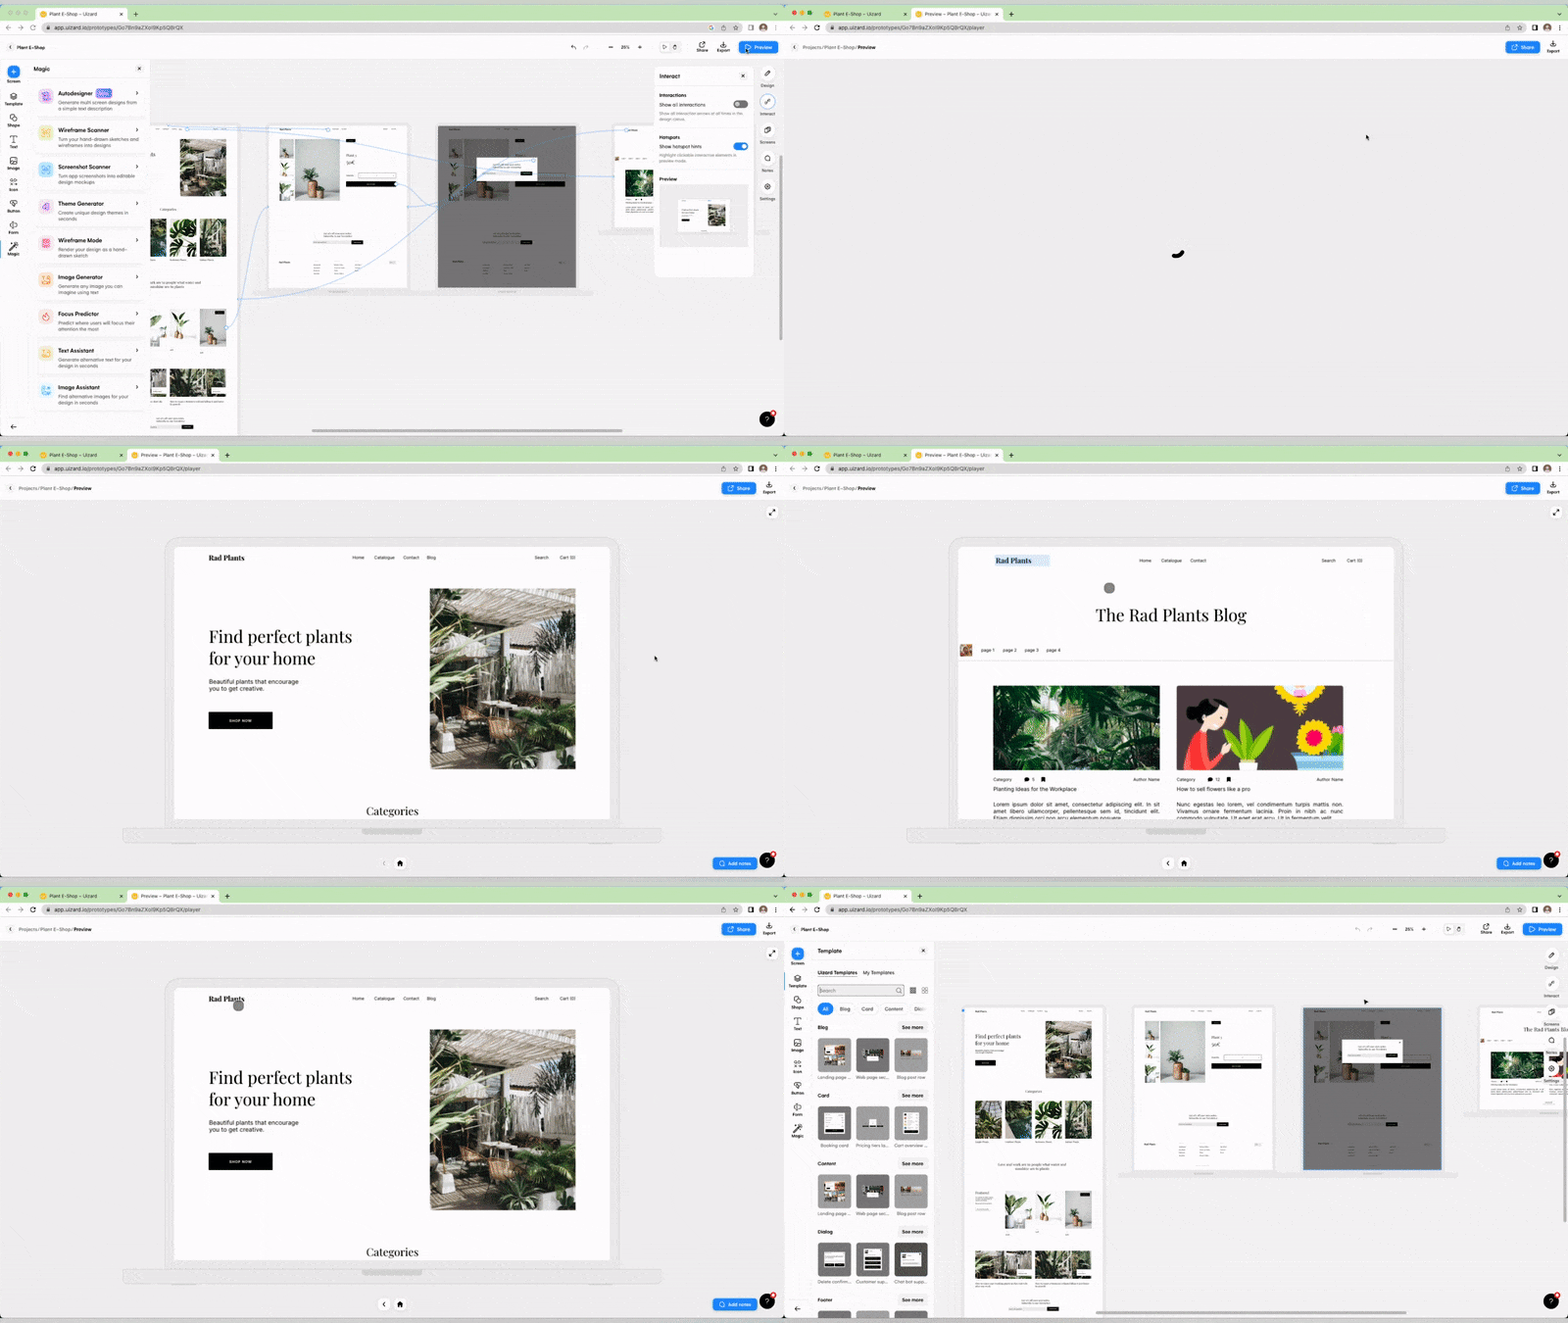
Once you are happy with a project in Uizard, it's now time to add some interactions to demonstrate your user journeys. Creating user-click journeys to transform your mockup into an interactive prototype is super easy with Uizard. Click the interact button to view any interactions currently in place (Uizard templates and Autodesigner outputs come with user interactions baked in) or add new ones by dragging the interact node from individual elements to other pages.
You can explore your user flows by clicking preview in the top right-hand corner of the Uizard app. This will open up your prototype in a new tab where you'll be able to click on the interactions and see what your user journeys would look like in reality.
Sharing your designs
Once you've finished your design and you are happy with your interactions, you can export, share, and gather feedback from teammates and external stakeholders.
You can export as a PNG, JPG, or PDF or you can send out a share link from the share menu. From this menu, you can also copy an embed code, which allows you to embed your clickable prototype elsewhere on the web.
Of course, you and your team can comment and keep the conversation inside of Uizard. To do so, just click on the notes tab and then click exactly where you would like to leave feedback. Kickstart a conversation with a summary of the work you’ve done, or wait for feedback to roll in once you’ve invited colleagues to work on a project collaboratively. Feedback and iteration have never been easier.
Congratulations, you are now a Uizard! With a little bit of Uizard magic, you can make difficult app, web, and UI design a thing of the past. If you haven't signed up for Uizard already, you can sign up for free right now and kickstart your next project in seconds.
