How to plan a website: The ultimate guide to turning your idea into reality

Even though there are a whole host of UX design tools that make designing and launching a new website easier than ever for business owners, in the words of writer Antoine de Saint-Exupéry, “A goal without a plan is just a wish.”
Planning can actually be a part of the web design process, starting with defining your project goals and understanding the customer problems you’re trying to solve. Thanks to the influence of Design Thinking, Lean Startup, and Agile software development methodologies, what used to require reams of detailed specifications and stage-gate approvals is now a much more fluid collaborative and experimental process. Some might even call it fun!
Informed by aspects of these three methods, this guide will show you, step by step, how to design an effective, efficient user-centered project plan and the short sprints of activities you’ll need to turn it into action.
How to plan a website in 6 steps
- Organise with sprints
- Asses your business needs
- Market research
- Define your UX strategy
- Ideate and prototype using prototyping software
- Test and iterate
1. Organize your website plan by sprints
A sprint, a term that originated with Agile software development, is a short, fixed period of time in which a whole team focuses on a specific problem or piece of work. Sprints are an ideal way to organize your website project plan because there’s a lot of freedom within the framework, and you can choose the activities that make the most sense to help you answer your specific questions.
Also, depending on the scale of your website project, you can size sprints to fit the needs of each phase and add as many as you like to fit your project scope. For example, you are likely to need several sprint loops within the design and development phases of your website project. The most important thing to remember is to keep your sprints short and singularly focused, i.e., on your user onboarding funnel or your checkout flow.
We structured part of our plan based on a method called the Double Diamond framework, in which the first few steps of planning your website are two-week-long sprints. In the first week of a sprint, you’ll gather intelligence and seek inspiration from a variety of sources. In the second week of each sprint, you’ll turn information into insights that will help you set the direction for the next phase.
For the last two phases of our plan, we suggest conducting a series of design sprints. Created by designer Jake Knapp at Google Ventures, the Design Sprint concentrates a full user experience design phase – from ideation to user testing – into “a five-day sprint for answering critical business questions through design, prototyping, and testing ideas with customers.”
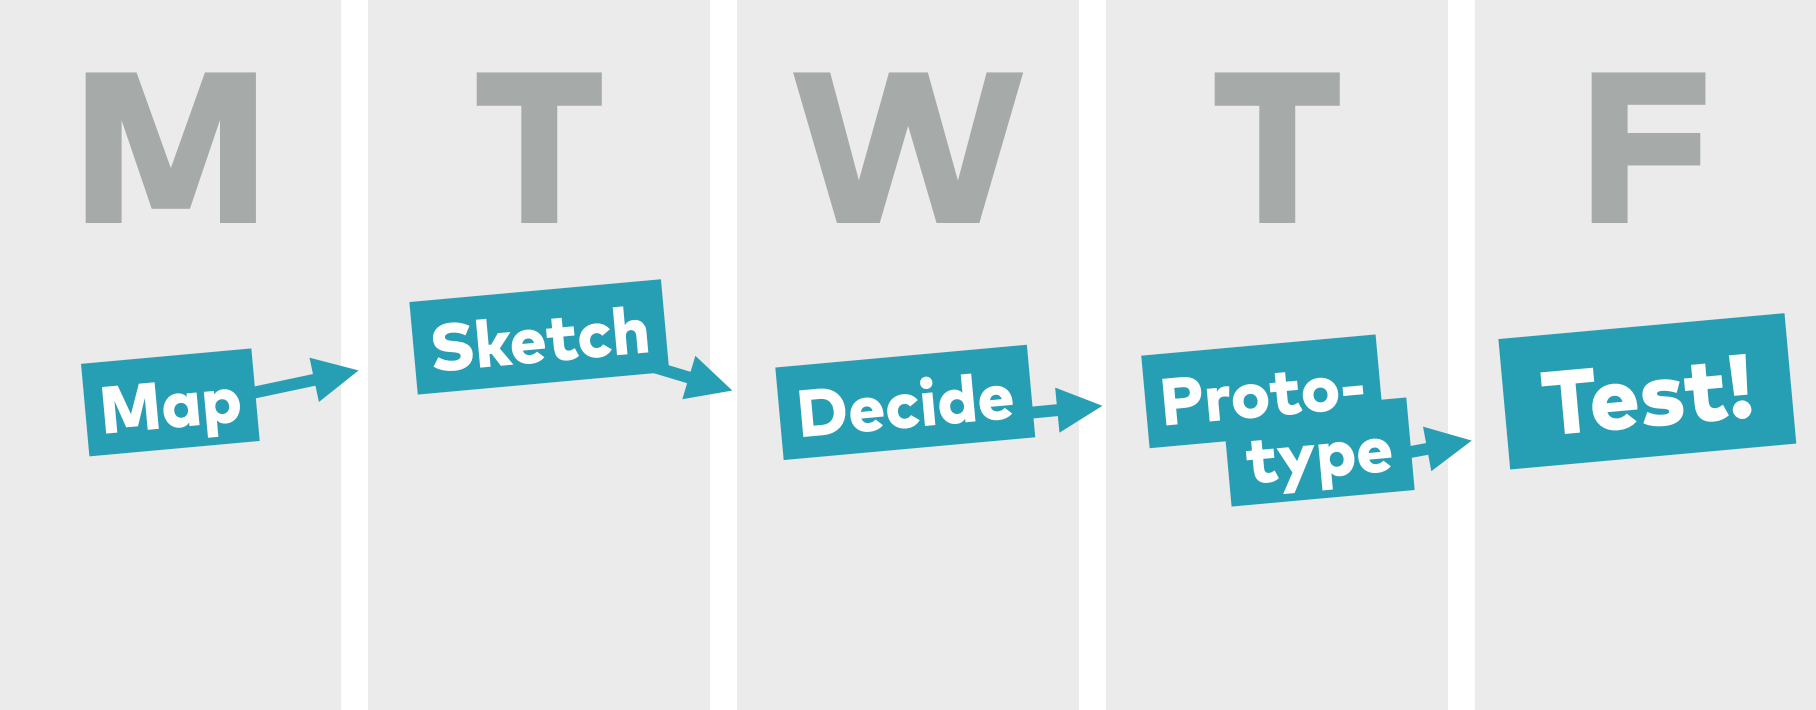
Design sprints are a great tool for organizing a more lean and nimble design process.
Once you’ve done some upfront strategy (see Steps 2-4 below), you might consider organizing your project plan for Steps 5-6 in loops of five-day design sprints as you work through your website’s key user flows and functionalities. We won’t go into the detailed design sprint method in this guide, but you can read our three-part series on how they work over in the Design strategy section of the Uizard blog. Okay, now let’s get started with establishing your project’s objectives.
2. Assess your business needs and set your project goals
You and your team members need to think critically about the purpose of your website and its role in your business before you make any serious investments in its development. In this first phase, you’ll dig into syncing up your project requirements with the time, money, and skills you have available to realize them.
Sprint Week 1: Assess project needs and available resources
First, establish the purpose of your website as either a hub or a spoke of your business. Define what objectives it serves: brand awareness, providing information, e-commerce, a destination for content, building community, or a professional portfolio. Usually, it’s a combination of several, so focus on defining your top three priorities.
Think about your website project scope: what features are table stakes for a Minimum Viable Product (MVP), which are negotiable, and what can wait for a later release.
Estimate how much time you want to invest in this project and how much bandwidth you and your team have to devote to it. Also, think about where in the process you might need specialized help to fill any skill gaps.
Research potential collaborators and agencies that you might want to work with and the services they offer. Think about reaching out for an exploratory chat to get a sense of how they work (and their fee structure).
Determine your budget spectrum, where you’re willing to invest whatever it takes and where you might need to compromise or keep it lean.
Compare website building options. You can go DIY by choosing one of the robust no-code templates on Wix or Squarespace. If you need more bespoke functionality, you might consider building on WordPress or Shopify, which allows many platform integrations and plugins. Or, if you have more complex needs, you might hire a web development agency to design and build your site, in which case, this guide can help you manage expectations as a client.
Sprint Week 2: Create a project brief
Develop your project budget and timeline. Your budget should break down allowances for all potential expenses, including admin costs (i.e., domain name purchase, web hosting, software purchases), internal team costs, external collaborator costs, and other service costs (i.e., technology platform licensing). Be sure to include substantial wiggle room to accommodate unforeseen expenses. Also, consider any external dependencies, like a trade show or perhaps a departmental budget, that will factor into your bottom line.
Create a project brief for any collaborators, whether freelancers or agencies. A project brief typically includes an overview of the project’s purpose, goals, any upfront requirements or dependencies, the scope of what it will (and won’t) cover, and, of course, budget and timeframe parameters.

A project brief identifies a brand's core values and how they can be reflected in your website. (Source: Red Fern)
3. Conduct customer + market research
Conducting research involves getting familiar with your main competitors’ websites and zooming in on your target audience’s needs so that you can create a differentiated experience that stands out in the marketplace. In this phase, your sprints are focused on translating market intelligence into insights that will drive your decision-making.
Sprint Week 1: Gather market intelligence
Identify the top three to five important trends and dynamics in your area of business. Look for standout stats that could help you benchmark your own website’s performance metrics, like understanding the most common causes of cart abandonment on e-commerce sites.
Audit your top three competitors’ websites, looking at how they are organizing information, their user experience, and their site’s look and feel. Think about how your own website will be positioned relative to your competitors by listing the ways your offer is unique or varied. You’ll expand on this later when you’re fine-tuning your value proposition.
Try the “GOOB” (get out of the building) approach to customer research. Observe user behaviors “in the wild” to see how people go about the real-world versions of tasks your website will be designed to help them accomplish. Talking to people as much as possible presents far better opportunities for uncovering surprising insights than reading a bunch of survey data.
Sprint Week 2: Identify your website’s opportunity space
Start by creating a simple slide deck that captures the key insights from your research to discuss with your team and stakeholders.
Organize some dedicated workshop time for your team to evaluate and prioritize all of the business and user problems, questions, and opportunities that you identified through your research. This will feed into articulating your website’s value proposition in the next phase.
Using your customer research insights, draft a set of personas for the top two or three target users your website is aiming to reach. You’ll use these as a reference for making decisions about features and messaging and also to help you find representative individuals to participate in user testing during your design sprints. These personas can evolve the more you learn, but at first, focus on creating a rough sketch of who your users are. Include basic demographic information and a high-level idea of their current pain points, needs, and values.
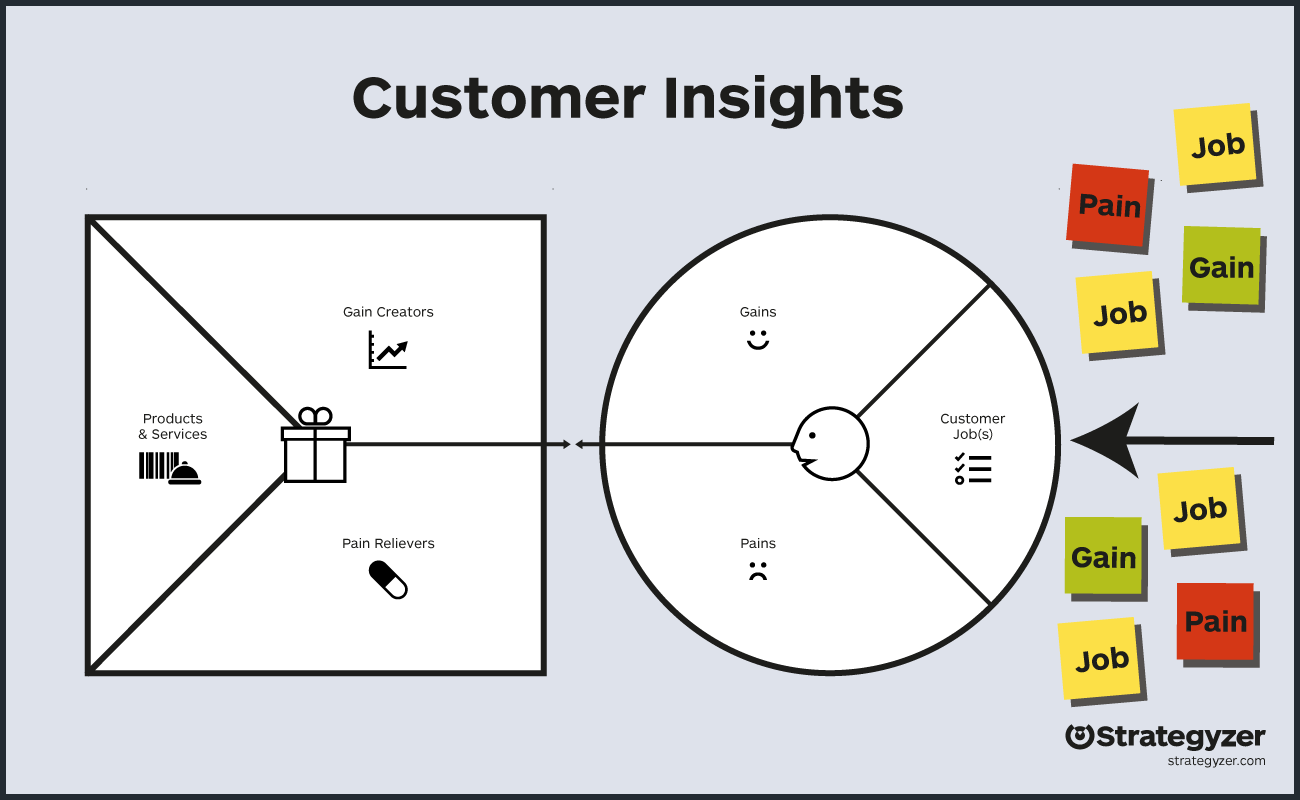
Strategyzer’s Strategyzer's Value Proposition Canvas creates a direct connection between your offering and customer needs.
4. Define your website’s UX strategy
User experience strategy is your team’s specific approach to how your website will achieve the goal of aligning your business objectives (outlined in phase 1) with users’ needs and the market dynamics (outlined in phase 2). The outcomes of your activities in this phase will drive the website design process, determining the why, what, and how of what your team decides to build and test.
Sprint Week 1: Clarify your website’s offering and value proposition
Create a spreadsheet of all of your website’s functional requirements: those you came up with yourself plus any new ideas gathered from customer and market research, as well as team and stakeholder input. Apply some simple organizing principles, i.e., grouping features into categories like “User Profile” or “Homepage.” For each feature, capture a short, basic description of what it’s meant to do.
Plan a two-part workshop session for your team. You can easily do this in one dedicated day; two hours for each session is a good place to start. The first part of your workshop day is for your team to refine the details of your website’s value proposition with clear, specific language that details the most important components of your offering. You’ll need to reference your personas here. This “ad-lib” template is a great way to try out different versions until you land on the right keywords.
“Our (product/service) helps (customer segment) who want to (customer goals) by (verbs: avoiding, reducing) a (customer pain point) and (verb: increasing, improving, etc.) (customer gain, value) unlike (competitor).”
For the second half of your workshop day, the team can work together to fill out the helpful Lean UX Strategy canvas. This simple eight-part canvas, co-created by Jeff Gothelf and Josh Seiden, puts a clear articulation of your strategy on one page, making it a great north-star reference to guide your design process.
Sprint Week 2: Get organized for your design and development phases
Develop a features matrix from your requirements spreadsheet to capture, organize, and prioritize the ongoing list of potential website features to be developed. You need this system in place in order to plan out your sequence of design sprints but also to make sure your team is always working on the most high-value items that deliver on business and user objectives.
2x2 feature prioritization matrix as suggested by Paper Leaf
Define your website MVP. In other words, what’s the least amount of website design and development work you need to do in order to learn the most important thing that validates your idea and provides directional feedback. It’s easier to manage user expectations when you start small and build your way forward iteratively, learning as you go.
Plan your initial series of design sprints. You don’t have to plan too far out. It’s better if you plan only two to three sprints at a time because what you learn in them is likely to impact what you work on next.
5. Ideate + prototype features, functionality, and key website pages
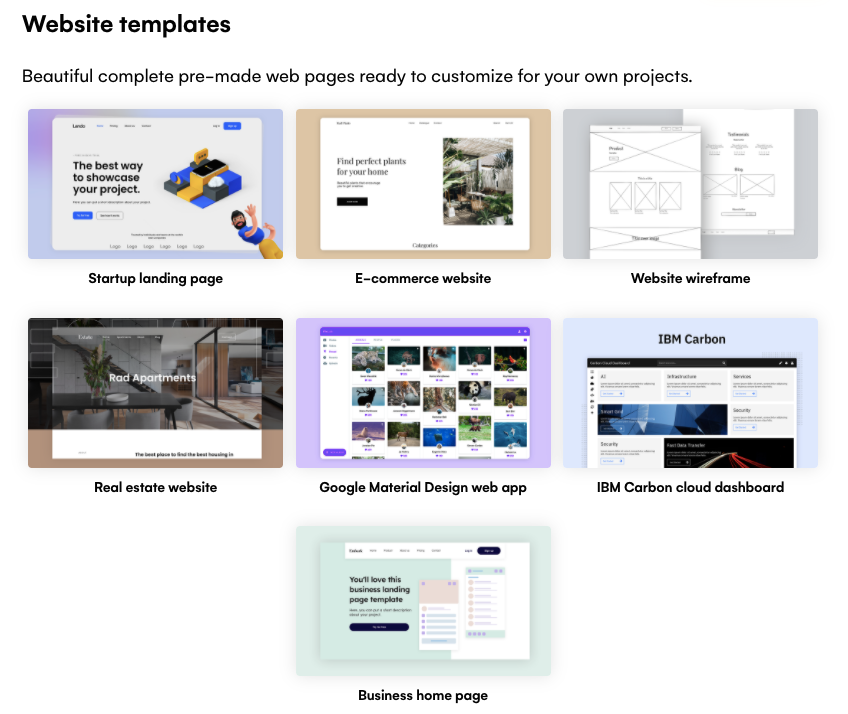
Ideation and prototyping are basically loops of turning big “what if?” questions into “how might we...” possible solutions for features and flows. Understandably, non-designers can find design-related activities intimidating. But tools like Uizard are an accessible starting point that have democratized the design process. If the pressure of the blank page is too daunting, Uizard’s website templates give you a baseline of structure and embedded UX best practices from which to customize according to your project’s requirements.
For this and the next phase, we suggest trying out some five-day design sprints to work through the website design process. Check out this amazing design sprint beginner’s guide by the pros at AJ&Smart.
Instead of breaking each phase into sprint weeks 1 and 2, here it makes more sense to provide an overview of the key design activities and deliverables that comprise this phase of the website design project plan.
Key Activities
- Ideation and co-creation workshops to brainstorm features and functionalities
- Moodboards for brand identity and visual exploration of color, fonts, illustration, and photography
- Sketches and user flows of key functionalities
- Wireframing key website pages to show navigation schemes, information hierarchy, and calls-to-action
- Design exploration mockups to apply variations on branding and visual elements to page layouts
- Copywriting page content for headlines, features and benefits messaging, and calls-to-action
Outcomes/Deliverables
- Website information architecture (sitemap) and navigation scheme
- Brand identity and visual design style guide (color palette, typography, icons, and elements)
- Content guidelines and SEO website copy
- Wireframes and prototypes to test with users
6. Test + iterate versions of your UX and design
Prototypes let you test how users will interact with a preliminary version of your website. Use your personas to help you craft profiles for recruiting user-testing subjects. In this phase, you are focused on the real-world feedback you get from putting your designs in front of users in order to clarify what’s essential to delivering the best user experience. These insights save time and money and reduce the risk of going too far down a path without validating your ideas.
Key Activities
- Remote or in-person user testing with paper or interactive prototypes
- A/B testing for variations of messages or key pages
- Design revisions and iterations based on testing feedback
Outcomes/Deliverables
- Insights from real customer behaviors and reactions
- Priorities for bug fixes, usability issues, and areas to revisit
- List of features and enhancements to add to the features matrix for prioritization
What next? Launch, learn, and repeat
With design sprints, you’ve built a system for collecting feedback into your website project plan and design process. Schedule a regular forum for your team to process and respond to the insights you’re gathering. Make sure you’re diligently capturing ideas for enhancements, improvements, and new features you’d like to add over time. Give yourself a head start on planning for future website updates and releases by creating a roadmap based on the priorities established in your features matrix.
Once your ideas feel sufficiently validated, it’s time to flip the switch and get started in Uizard. But first, take some time to celebrate with your team! Don’t you love it when a plan comes together?